Showing posts with label drill. Show all posts

Sunday, 7 October 2012

GoPro Hero2 HD External Microphone

I'm really pleased with my new GoPro Hero2 HD video camera.  The picture is awesome.  Only issue is the sound quality, or more specifically the problem of wind noise. With the skeleton door on the back of the case it is pretty bad.  With the waterproof solid door it is better, but you still get a lot of wind noise (bad) and not much engine noise (good).

Anyway, I investigated external mikes and bought the following off eBay: UltraDisk 4036 Omnidirectional Hands Free Car Kit Microphone 3.5mm 3 Metre Cable.


Then I drilled a 9mm hole carefully in the nice new waterproof case.  Yes, I know, it won't be waterproof anymore!  I then routed the cable around the roll cage and attached the mike under the scuttle on the exhaust side.


Tried it out and success.  The wind noise is almost gone and you can hear the engine much better.  This test video was taken before I had drilled the hole in the case, hence the reason why it's just resting on the passenger seat.  Didn't want to drill hole until I knew that it was going to improve the sound.


Tuesday, 28 August 2012

Rear Half of Roll Cage Fitted

The previously made template was used to accurately mark out where the holes needed to be cut for the rear bracing tubes.  A hole saw and a curved file were used for this.


What I hadn't appreciated was that these bracing tubes were at a slight angle.  Meaning that the holes had to be widened to get the ends through, before the rear half of the cage could be lowered in to place.  Covers will need to be made for these.  Probably out of aluminium sheet sprayed white.

The feet were then bolted on to the bracing tubes and holes drilled in the rear of the chassis to accommodate the fixing bolts.  All in all not too bad a fit, the fabrication tolerances probably within a few millimetres.

Luckily the off-side bracing tube clears the fuel filler by about 10mm and also the filler pipe below.  Phew!  That was a close call.


After fitting I tried to get in the boot.  Oh dear, we have a problem.  Looks like the boot on the Avon Mk2 bodywork will only open to about 45 degrees with the roll cage fitted.  Never mind, access is still pretty good.


Next on to the front half of the roll cage...


Wednesday, 17 November 2010

Steering column (upper and lower)

Two 12mm holes were drilled in the upper steering column mounting brackets. These were drilled towards the top to allow maximum leg room for the driver. The steering column is adjustable so it will be possible to lower it if required.


Sturdy 12mm socket head bolts were used to securely mount the upper steering column. Initially the grey plastic bush at the lower end of the upper steering column was chafing on the chassis mounted cylindrical bracket (tube). To minimise this I used a file to smooth the edge of the tube - removing a hard lip of powder coat and slightly radiusing the edge. Finally a smear of grease was added to the inside of the tube prior to assembly.


The lower steering column simply bolted in three places: to the triangular tube at the bottom of the upper steering column, the steering rack, and in the middle the rose joint bolts to one of the side chassis tubes. This rose joint mounting was left loose as it may need to be removed to install the engine. When it is ready for final assembly a thread lock solution will be used.

Tuesday, 9 November 2010

Steering Rack

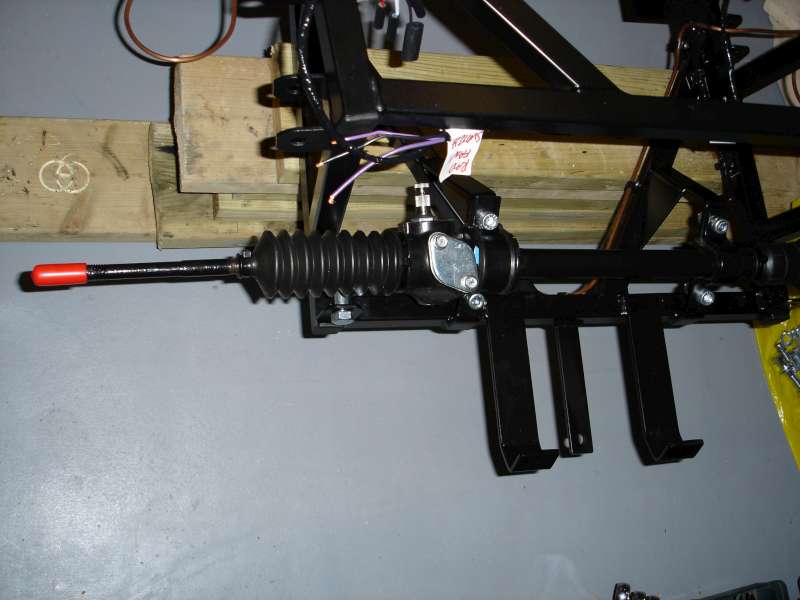
Time to mount the Tiger quick steering rack. This is achieved by using the two clamps, each with a rubber insert. The clamps, as supplied by Tiger, are nothing more than bent pieces of steel. The rubbers each have a split underneath to allow it to be passed around the steering rack.


First the clamps had to be painted with black Hammerite and then measured for drilling the bolt holes. With the holes drilled it was simply a case of bolting through, while making sure that the rubbers were in the right position on the steering rack iteself.

Monday, 4 October 2010

Aluminium panelling (nearly) completed

All alluminium panels have now been cut to size, drilled and attached with Sikaflex and rivets. The only exceptions are the upper sides of the upper rear quarter panels, the transmission tunnel top, transmission tunnel passenger side as well as the battery tray. These will be attached later, only after access is no longer needed, e.g. to mount the gearbox, bodywork, etc.

The aluminium was cut using standard, new (sharp) tin snips, filed where necessary and then deburred using the pen style deburring tool. Rivets were spaced at 75mm intervals, or less where the distance was divided to provide an even spacing less than 75mm. Sikaflex sealant was used relatively sparingly, making sure the drilled holes were covered, prior to rivetting.

After fitting the panels I ran a bead of Sikaflex along the joints that needed it. Masking tape was applied about 5mm each side of the joint, a thin bead of Sikaflex was run along the joint, before smoothing out with a very sticky finger and finally removing the masking tape.

Overall I am quite pleased with the finish. There are few bits where I would do it differently if I were to do it again, but isn't that's always the way.


Saturday, 31 July 2010

Aluminium panelling started

Aluminium floor panel for the driver's side now cut to size and drilled ready for riveting. The passenger side floor panel had been cut too small by Tiger. One quick phone call and Tiger sent a replacement within a couple of days.