This blog documents my Tiger Avon kit car build project. The Tiger Avon is a Lotus 7 inspired car, using donor parts mostly from a Ford Sierra. My car is powered by a 2.0 Zetec engine from a Ford Focus.
Saturday 31 July 2010
Aluminium panelling started
Wednesday 14 July 2010
One small step... (well two actually)
Tuesday 13 July 2010
eBay is my friend
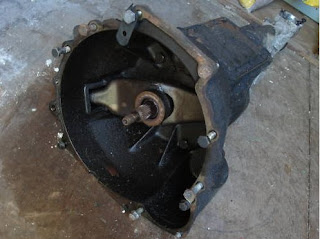
Up to this point I was still not in posession of a Type-9 five speed gearbox. It seems to be getting harder and harder to find a good example at a fair price (excluding fully re-conditioned units at £400, inc. bell housing).

Finally I won a good Type-9 on ebay for a reasonable price. Problem was, like so many, they are in other parts of the country. A 250 mile round trip was needed to pick this up. Apparently, this unit was bought as a spare by a Robin Hood owner. It was removed by the Robin Hood owner after driving the Sierra home and appeared to be working fine at the time. Fingers crossed, we'll find out if that is the case (much) later on.

Finally I won a good Type-9 on ebay for a reasonable price. Problem was, like so many, they are in other parts of the country. A 250 mile round trip was needed to pick this up. Apparently, this unit was bought as a spare by a Robin Hood owner. It was removed by the Robin Hood owner after driving the Sierra home and appeared to be working fine at the time. Fingers crossed, we'll find out if that is the case (much) later on.
Monday 12 July 2010
Rear beam dismantled
Here is the Sierra rear beam as collected from Tiger:

Like everything else the brake drums were very rusty. In fact they were rusted on to the driveshafts. A large hub puller and generous amounts of WD-40 soon changed that. The rest of the dismantling was fairly straight forward and now I have the component parts ready for restoration. The suspension beam and drums will be discarded. All other parts were kept for re-use or reference. That said the majority of the brake components will be replaced for new items.
Here is the final drive, as well as one driveshafts with associated brake assembly:
Labels:
dismantling,
driveshaft,
final drive,
Sierra rear beam
Saturday 10 July 2010
Collection of chassis from Tiger
After loading up with the additional parts we headed down the road to the Tiger workshop to pick up the donor parts ordered and go out for a drive in one of the Tiger demonstrator cars. While at the workshop I had an opportunity to take lots (100-ish) of photos of an Avon being factory built. These should prove invaluable during my build. They can be found here: http://rapidshare.com/files/407147149/Tiger_Avon_Factory_Build_Pics.zip
Sierra donor rear beam ready for loading into the back of the van.
Then time for a spin in the Aviator with Jim.
Subscribe to:
Posts (Atom)